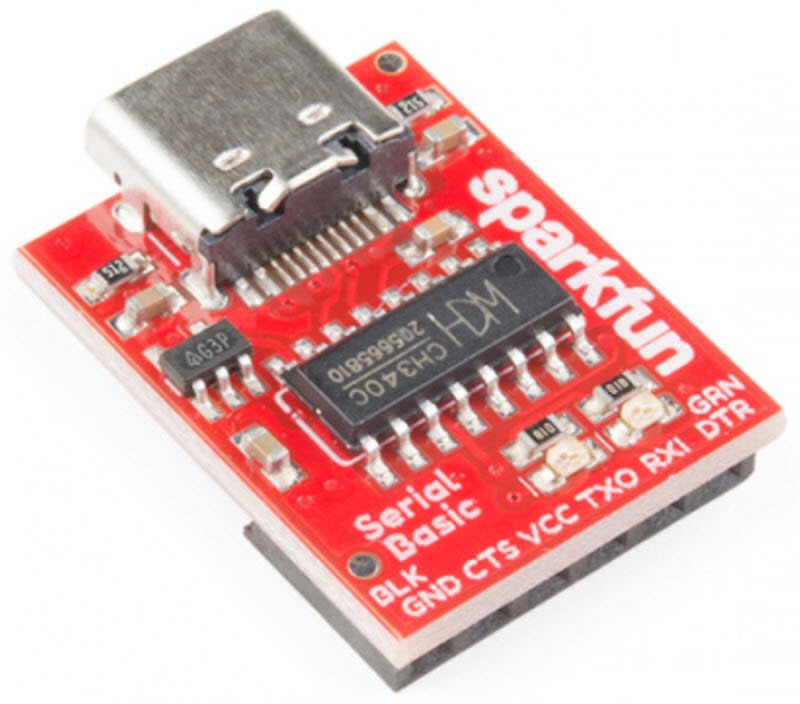
メーカー品番 15096
SPARKFUN SERIAL BASIC BREAKOUT -
SparkFun Electronics
Adapters Microcontrollers Drivers / Controllers Wire Jumper Wires Wired USB Arduino Raspberry Pi MCU
Guide by bboyho, santaimpersonator
In this tutorial, we'll show you how to install CH340 drivers on multiple operating systems if you need. The driver should automatically install on most operating systems. However, there is a wide range of operating systems out there. You may need to install drivers the first time you connect the chip to your computer's USB port or when there are operating system updates.

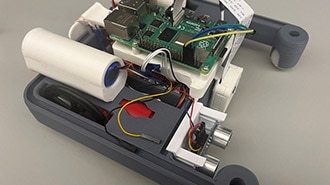
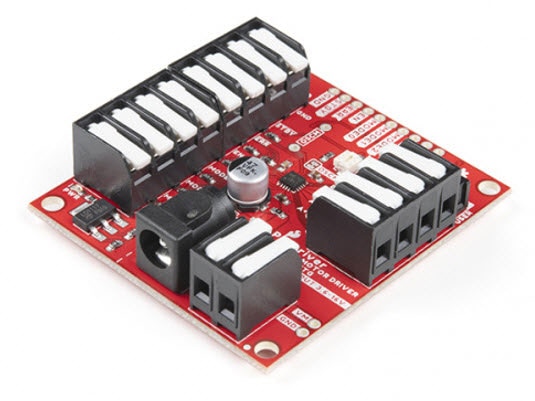
Depending on your application, the CH340 may be populated on a breakout or development board. Here are a few boards that use this particular USB-to-serial converter.
You'll also need the correct USB cable to connect the board to your computer. You may need a jumper wires and a breadboard for prototyping.
Before you begin this tutorial, you should have the Arduino IDE installed on your computer. Check out our Installing Arduino tutorial for a step by step guide.
Alright, let's get to work! You can visit the next section to learn more about the CH340 and why you need the drivers, or you can skip straight to the operating system of your choice!
There are a few variants of the CH340. The CH340G requires an external crystal oscillator to function while the CH340C includes a built-in crystal oscillator. However, both function in the same fashion - they convert USB data for a serial UART and vice versa!
 CH340G
 CH340C
The CH340 is also populated on development boards such as the RedBoard Qwiic to upload code using the Arduino IDE.

The CH340 has been tested on:
These operating systems have the CDC drivers pre-installed, which means you shouldn't need to install any extra software. However, there are a wide range of operating systems out there, so if you run into driver problems, you can get the archived drivers linked below:
The CH340 is made by WCH. You can find the latest version of their drivers in their English translated website.
Note: At the time of writing, you were only able to find the latest version of their drivers from their website in Mandarin. If you use a Chrome web browser, you had the option to have the web page translated. However, you now have the option of browsing the WCH website in either language. For those interested in heading to the Mandarin side, you can click on the button below.
If you have the older CH340 drivers installed, you may need to update them. In the following sections, are the instructions for doing so on each of the tested operating systems.
Note for Educators: You will need to obtain administrative privileges from your network or IT administrator in order to install these drivers. Make sure to test the drivers before class and set aside some time with students in the classroom when installing the drivers.
Download and run the executable.
Click the "Uninstall" button first. Then click on the "Install" button.
 Windows CH340 Driver Installation
To verify that your driver is working, you should see a difference in the following pictures after plugging the CH340 to a USB port.
To check that the CH340 enumerates to a COM port, you can open the device manager. You can click the Start or ⊞ (Windows) button and type "device manager" to quickly search for the application.
 Using the search on Windows 10 to look for the device manager.
Note: On Windows 10, the quick search function is picky on the spelling of the application you are searching for. For example, you may get results using "devi" and none for "device".
After opening the device manager, you will need to open the Ports (COM & LPT) tree. The CH340 should show up as USB-SERIAL CH340 (COM##). Depending on your computer, the COM port may show up as a different number.
 Screenshot of Window 10 Device Manager with a CH340 displayed on COM123.
Alternatively, if you have the Arduino IDE installed, you should also see a change in the number of available COM Ports (you may need to restart the Arduino IDE for the board to populate). Without the CH340 connected to your computer, click on Tools > Port. Take note of the Serial Ports available.

Connect the CH340 to your computer's USB port. Click on somewhere else on the screen for the menu to refresh itself. Then head back to the menu by clicking on Tools > Port. A new COM port should pop up. By process of elimination, the CH340 should have enumerated to the new COM port! Feel free to click on the COM port to select if you are uploading code to a microcontroller. Depending on your computer, the COM port may show a different number.

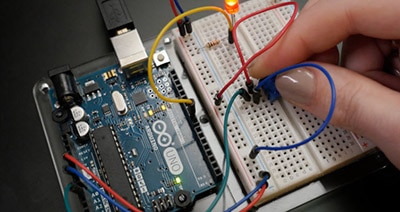
You can also verify if the USB-to-serial converter is working by doing a serial loop back test or echo test. If you are using the breakout board, you can add a jumper between the Tx and Rx to try and echo a character in a terminal program. For more information, try checking out the Hardware Test for the serial basic hookup guide.
 Serial Loop Back Test with a Jumper Wire
Note for Educators: You will need to obtain administrative privileges from your network or IT administrator in order to install these drivers. Make sure to test the drivers before class and set aside some time with students in the classroom when installing the drivers.
Warning: If you have a Mac OS X v10.12+ (i.e. High Sierra, Mojave), your computer may restart as soon as you insert the CH340 to your computer. We recommend that you uninstall the old drivers first and follow these directions below before connecting the CH340 to your COM port. If you observe this issue, you will need to unplug the CH340 from your USB port, restart the computer, and follow the steps below to reinstall the latest drivers.
Open the Terminal program by selecting Go > Applications.

Select and open the Terminal program under Applications > Utilities > Terminal.

Note: You can also search with Spotlight by pressing ⌘ (Command) + space bar (Space Bar). Then type "Terminal" and double-click the search result.
If you are still unsure of how to access the Terminal, watch this video or read this Apple support article.
You'll need to move to the directory where the *.kext files are stored.
cd /Library/Extensions
cd /System/Library/Extensions
In this case, we will be using Mac OSX v10.13, so we will need to use the first command.

To check to see if the CH340 driver is in the correct path, use the following command to list the contents of the folder.
ls
To look for CH340 driver files (i.e., usb.kext or usbserial.kext) in the path, you could use the following command.
ls | grep usb
You should see something similar to the output below after using the commands.

If you have found the file in the path, you will need to run each of the following commands in the CLI/Terminal to remove old CH340 drivers. In this case, there was only the usbserial.kext file but it does not hurt to run both commands. Make sure to have administrative privileges to ensure that the drivers are removed.
sudo rm -rf /Library/Extensions/usb.kext
sudo rm -rf /Library/Extensions/usbserial.kext
Check if the old drivers were removed in the paths by using the ls command with your respective OS version. You will notice that the *.kext file is removed from the respective paths. In this case, the usbserial.kext was removed from Mac OSX High Sierra.
ls

Download and extract the folder.
Then, open the "*.pkg" file from the unzipped folder and follow the instructions. You'll need to restart your computer for the changes to take effect.
 Mac OSX CH340 Driver Installation File
Heads up! Depending on your settings, you may need to adjust your Security & Privacy settings to allow the CH340 drivers to function. A window may pop up indicating that the drivers have been block as shown in the image below.

If you receive a window that indicates that the system extension is blocked, you'll need to open a search with Spotlight by pressing ⌘ (Command) + space bar (Space Bar). Type Security & Privacy and click on the "Allow" button to enable the CH340 drivers.

To verify that your driver is working, you should see a difference in the following pictures after plugging the CH340 to a USB port.
Open the Terminal by heading to Applications > Utilities > Terminal if the program is not open yet.

Note: Press ⌘ (Command) + space bar (Space Bar) to launch Spotlight and type "Terminal," then double-click the search result as explained above.
If you are still unsure of how to access the Terminal, watch this video or read this Apple support article.
Then run the following command:
ls /dev/cu*
A list of devices connected to your Mac's COM ports will be displayed as a result. Assuming that the CH340 is not connected to your computer, you should see something similar to the image below.

Connect the CH340 to one of your Mac's COM ports. Check for the following changes (your board may show up under a different device name). The CH340 should show up as /dev/cu.wchusbserial*****. Depending on your computer, the COM port may show up as a different number.
 Screenshot of Mac OSX terminal with CH340 on cu.wchusbserialfd1410.
Alternatively, if you have the Arduino IDE installed, you should also see a change in the number of available COM Ports (you may need to restart the Arduino IDE for the board to populate). Without the CH340 connected to your computer, click on Tools > Port. Take note of the Serial Ports available.

Connect the CH340 to your computer's USB port. Click on somewhere else on the screen for the menu to refresh itself. Then head back to the menu by clicking on Tools > Port. A new COM port should pop up. By process of elimination, the CH340 should have enumerated to the new COM port! Feel free to click on the COM port to select if you are uploading code to a microcontroller. Depending on your computer, the COM port may show a different number.

You can also verify if the USB-to-serial converter is working by doing a serial loop back test or echo test. If you are using the breakout board, you can add a jumper between the Tx and Rx to try and echo a character in a terminal program. For more information, try checking out the Hardware Test for the serial basic hookup guide.
 Serial Loop Back Test with a Jumper Wire
Note for Educators: You will need to obtain administrative privileges from your network or IT administrator in order to install these drivers. Make sure to test the drivers before class and set aside some time with students in the classroom when installing the drivers.
Run the following commands in the CLI/Terminal when using Raspbian on a Raspberry Pi. After updating, the latest CH340 should be installed!
sudo apt-get update
sudo apt-get upgrade
Here is a downloadable *.ZIP of standard CH340 drivers for Linux.
There are some reported cases of serial communication failure when using the factory drivers in Linux. If you encounter this problem, you can try installing patched drivers as explained in this forum post. Here are the steps (to run in the command line):
[  xxx] ch341-uart ttyUSB0: ch341-uart converter now disconnected from ttyUSB0
[  xxx] ch341 3-2:1.0: device disconnected
[  xxx] ch34x ttyUSB0: ch34x converter now disconnected from ttyUSB0
[  xxx] ch34x 3-2:1.0: device disconnected
Depending on your root permissions, you may need to configure the serial port with the following two commands. Make sure to adjust the $username with respect to the user ID that is currently logged in.
sudo usermod -a -G dialout $username
sudo chmod a+rw /dev/ttyUSB0
Heads up! Depending on how the CH340 enumerated on your computer, the /dev/ttyUSB0 may be different. Try using ls command as explained in the Driver Verification if you have issues configuring the serial port settings and adjusting the port as necessary.
Plug the CH340 back to your computer's USB port. Then run the following command in the CLI/Terminal on any Linux distribution. Check for the following changes (your board may show up under a different device name).
ls /dev/ttyUSB*
The serial port that CH340 is connected to should pop up as a result.
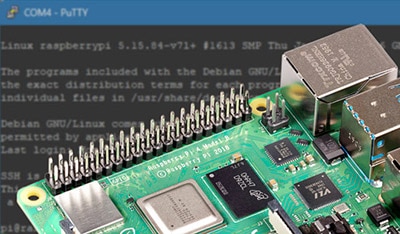
 Screenshot of Raspberry Pi CLI with the CH340 on ttyUSB0.
Alternatively, if you have the Arduino IDE installed, you should also see a change in the number of available COM Ports (you may need to restart the Arduino IDE for the board to populate). Without the CH340 connected to your computer, click on Tools > Port. Depending on the Linux flavor that you have, the Ports may not open to display any serial ports. Take note of the Serial Ports available if it opens up.

Connect the CH340 to your computer's USB port. Click on somewhere else on the screen for the menu to refresh itself. Then head back to the menu by clicking on Tools > Port. A new COM port should pop up. By process of elimination, the CH340 should have enumerated to the new COM port! Feel free to click on the COM port to select if you are uploading code to a microcontroller. Depending on your computer, the COM port may show a different number.

You can also verify if the USB-to-serial converter is working by doing a serial loop back test or echo test. If you are using the breakout board, you can add a jumper between the Tx and Rx to try and echo a character in a terminal program. For more information, try checking out the Hardware Test for the serial basic hookup guide.
 Serial Loop Back Test with a Jumper Wire
We have had a few reports on Windows 10 where the driver will automatically install and the board will show up under a new COM port as USB-Serial CH340, but with a different device name. However, the board cannot be accessed on the Arduino IDE. Others have had issues where the installation process hangs.
Based on the customer experiences, this might be specific to the manufacturer and are usually isolated cases. Users seem to be able to eventually get the board recognized by a combination of giving the computer time to finish the install (close to 20 min), plugging the board back in multiple times, reinstalling the drivers, and/or resetting the computer multiple times (repeat both steps).
If you installed the drivers for the CH340 on your computer but have issues connecting via serial terminal or uploading code using the Arduino IDE, there may be an issue with your user settings preventing you from using the CH340. You may receive an avrdude: ser_open(): can't open device error similar to the output shown below.
avrdude: ser_open(): can't open device "/dev/ttyUSB0": No such file or directory
In this case, the error appeared on a Linux when trying to upload code due to the drivers not being installed and the root permissions.

Make sure to check your configuration settings and ensure that the serial port for the CH340 is enabled for your OS. You may also need to reinstall the drivers for your operating system.
Certain USB cables are for power only and may not have the data lines available. Try checking your USB cable and ensure that the data lines are intact.
If you are uploading to certain boards like the Apollo3 on the Artemis development boards with fast baud rates, there are some platforms (Linux flavors) where the standard CH340 USB to serial drivers don't operate well at speeds higher than 115200. So if you run into upload problems, consider reducing the upload speed. For more information about upload issues, see this forum post and consider upgrading with these drivers for Mac OSX or these for Linux.
Now that you've successfully got your CH340 up and running, it's time to incorporate it into your own project!