Mfr Part # 4333
CIRCUIT PLAYGROUND BLUEFRUIT BLE
Adafruit Industries LLC
License: See Original Project 3D Printing Addressable LEDs Light WS2812/SK6812 (NeoPixel) Circuit Playground
Guide by Ruiz Brothers
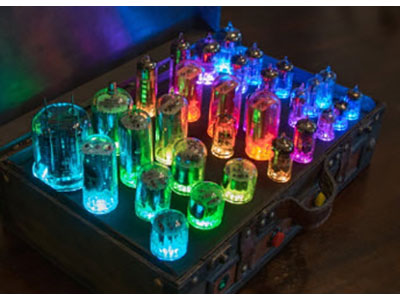
Build a stained glass inspired lamp with tap and Bluetooth controls.
Use translucent filament to give the shades a stained glass effect.
This project features light meter mode, audio reactivity and colors and animations.
Tap detect is used to cycle through color modes, or use the Adafruit Bluefruit Connect app to adjust the brightness.
The Circuit Playground Bluefruit has many built-in sensors including light, temperature, accelerometer and microphone.
In light meter mode, as the light levels decrease, the lamp brightness to a red color. When light levels rise, the lamp switches to daylight colors.
The PDM microphone is used for the audio reaction mode to display sound levels.
7 x M3X6mm Screws
3 x M3 nuts
1 x M3x5mm screws
8 x M2x6mm screws
3MF files for 3D printing are oriented and ready to print on FDM machines using PLA filament. Original design source files may be downloaded using the links below.
The dropdown on the Fusion 360 site allows you to pick your preferred 3D file format like STEP, STL, etc.
The parts were sliced using BambuStudio using the slice settings below.
PLA filament 220c extruder
0.2 layer height
10% gyroid infill
200mm/s print speed
Trees Supports
60c heated bed
The project assembly was designed in Fusion 360. Once opened in Fusion 360, It can be exported in different formats like STEP, STL and more.
Electronic components like Adafruit's boards, displays, connectors and more can be downloaded from the Adafruit CAD parts GitHub Repo.
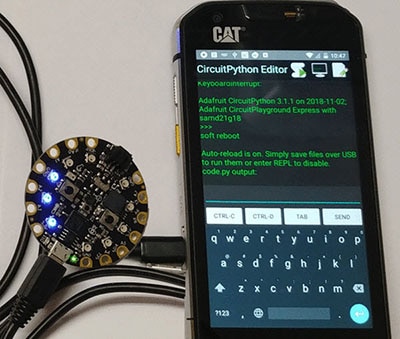
Follow this quick step-by-step to install or update CircuitPython on your Circuit Playground Bluefruit.
Download the latest version of CircuitPython for this board via circuitpython.org
Click the link above and download the latest UF2 file
Download and save it to your Desktop (or wherever is handy).
Plug your Circuit Playground Bluefruit into your computer using a known-good data-capable USB cable.
A lot of people end up using charge-only USB cables and it is very frustrating! So make sure you have a USB cable you know is good for data sync.
Double-click the small Reset button in the middle of the CPB (indicated by the red arrow in the image). The ten NeoPixel LEDs will all turn red, and then will all turn green. If they turn all red and stay red, check the USB cable, try another USB port, etc. The little red LED next to the USB connector will pulse red - this is ok!
If double-clicking doesn't work the first time, try again. Sometimes it can take a few tries to get the rhythm right!
(If double-clicking doesn't do it, try a single-click!)
You will see a new disk drive appear called CPLAYBTBOOT.
Drag the adafruit_circuitpython_etc.uf2 file to CPLAYBTBOOT.
The LEDs will turn red. Then, the CPLAYBTBOOT drive will disappear and a new disk drive called CIRCUITPY will appear.
That's it, you're done! :)
Once you've finished setting up your Circuit Playground Bluefruit with CircuitPython, you can access the code and necessary libraries by downloading the Project Bundle.
To do this, click on the Download Project Bundle button in the window below. It will download to your computer as a zipped folder.
# SPDX-FileCopyrightText: Adafruit Industries
# SPDX-FileCopyrightText: 2026 Pedro Ruiz for Adafruit Industries
#
# SPDX-License-Identifier: MIT

# Code written by Adafruit Industries
# Adafruit Circuit Playground Express Bluefruit

# pylint: disable=global-statement

import time
import math
import array
import board
import digitalio
import neopixel
import analogio
import audiobusio
import touchio
import busio
import adafruit_lis3dh

from adafruit_ble import BLERadio
from adafruit_ble.advertising.standard import ProvideServicesAdvertisement
from adafruit_ble.services.nordic import UARTService

from adafruit_bluefruit_connect.packet import Packet
from adafruit_bluefruit_connect.color_packet import ColorPacket
from adafruit_bluefruit_connect.button_packet import ButtonPacket
import adafruit_fancyled.adafruit_fancyled as fancy

# setup pixels
pixels = neopixel.NeoPixel(board.NEOPIXEL, 10, brightness=1, auto_write=True)

# name colors so you don't need to refer to numbers
RED = (255, 0, 0)
BLACK = (0, 0, 0)
GREEN = (0, 255, 0)
PURPLE = (100, 0, 255)
BLUE = (0, 0, 255)

# Declare a 6-element RGB rainbow palette
PALETTE_RAINBOW = [fancy.CRGB(1.0, 0.0, 0.0), # Red
           fancy.CRGB(0.5, 0.5, 0.0), # Yellow
           fancy.CRGB(0.0, 1.0, 0.0), # Green
           fancy.CRGB(0.0, 0.5, 0.5), # Cyan
           fancy.CRGB(0.0, 0.0, 1.0), # Blue
           fancy.CRGB(0.5, 0.0, 0.5)] # Magenta

NUM_LEDS = 10
offset = 0  # animation position offset
active_palette = None  # currently running palette animation
active_color = None  # currently breathing solid color

def update_palette():
    """Advance one frame of the active palette animation."""
    global offset
    if active_palette is None:
        return
    for i in range(NUM_LEDS):
        color = fancy.palette_lookup(active_palette, offset + i / NUM_LEDS)
        color = fancy.gamma_adjust(color, brightness=0.25)
        pixels[i] = color.pack()
    pixels.show()
    offset += 0.05

def update_breathing():
    """Slowly breathe the active solid color between brightness 0.2 and 0.5."""
    if active_color is None:
        return
    # Sine wave oscillates 0-1, scale to 0.2-0.5 range
    brightness = 0.35 + 0.15 * math.sin(time.monotonic() * 1.5)
    r = int(active_color[0] * brightness)
    g = int(active_color[1] * brightness)
    b = int(active_color[2] * brightness)
    pixels.fill((r, g, b))

# --- VU Meter (audio reactive) setup ---
mic = audiobusio.PDMIn(
    board.MICROPHONE_CLOCK, board.MICROPHONE_DATA,
    sample_rate=16000, bit_depth=16)
samples = array.array('H', [0] * 320)

CURVE = 2
SCALE_EXPONENT = math.pow(10, CURVE * -0.1)

def constrain(value, floor, ceiling):
    return max(floor, min(value, ceiling))

def log_scale(input_value, input_min, input_max, output_min, output_max):
    normalized_input_value = (input_value - input_min) / (input_max - input_min)
    return output_min + math.pow(normalized_input_value, SCALE_EXPONENT) * (output_max - output_min)
last_vu_input = 0
active_vu = False  # VU meter mode flag

# VU meter colors mapped to 10 NeoPixels
VU_GREEN = (0, 127, 0)
VU_YELLOW = (127, 127, 0)
VU_RED = (127, 0, 0)
VU_OFF = (0, 0, 0)
vu_colors = [VU_GREEN, VU_GREEN, VU_GREEN, VU_GREEN,
             VU_YELLOW, VU_YELLOW, VU_YELLOW,
             VU_RED, VU_RED, VU_RED]

def mean(values):
    """Average of mic sample values."""
    return sum(values) / len(values)

def normalized_rms(values):
    """Return normalized RMS of mic samples."""
    minbuf = int(mean(values))
    samples_sum = sum(
        float(sample - minbuf) * (sample - minbuf)
        for sample in values
    )
    return math.sqrt(samples_sum / len(values))

vu_level = 0.0  # smoothed VU level

def update_vu():
    """Update NeoPixels based on mic input level with smooth rise and fall."""
    global last_vu_input, vu_level, input_floor, input_ceiling
    if not active_vu:
        return
    mic.record(samples, len(samples))
    magnitude = normalized_rms(samples)
    # Adaptive noise floor: continuously tracks ambient noise
    # (including BLE radio EMI) so the meter stays zeroed.
    if magnitude < input_floor:
        # Below floor — floor drifts down slowly
        input_floor = input_floor * 0.999 + magnitude * 0.001
    elif magnitude < input_floor + 4:
        # Near the floor — this is still noise, nudge floor up
        input_floor = input_floor * 0.9 + magnitude * 0.1
    input_ceiling = input_floor + 15.0
    # Compute scaled logarithmic reading in the range 0 to NUM_LEDS
    target = log_scale(
        constrain(magnitude, input_floor, input_ceiling),
        input_floor, input_ceiling, 0, NUM_LEDS)
    # Smooth: rise slowly, fall even slower
    if target > vu_level:
        vu_level = vu_level + (target - vu_level) * 0.3
    else:
        vu_level = vu_level + (target - vu_level) * 0.12
    input_val = int(vu_level)
    if last_vu_input != input_val:
        pixels.fill(VU_OFF)
        for i in range(min(input_val, NUM_LEDS)):
            pixels[i] = vu_colors[i]
        pixels.show()
        last_vu_input = input_val

# Sentinel for VU meter mode in animation list
VU_METER = "VU_METER"

# --- Light Sensor setup ---
light = analogio.AnalogIn(board.LIGHT)
active_light = False  # Light sensor mode flag
light_level = 0.0  # smoothed light level

# Light meter warm colors
LIGHT_DIM = (52, 5, 1)
LIGHT_BRIGHT = (9, 5, 4)

last_light_color = (0, 0, 0)  # track last written color

def update_light():
    """All 10 LEDs blend between dim and bright color based on light level."""
    global light_level, last_light_color
    if not active_light:
        return
    # 0.0 = dark room (dim color), 1.0 = bright room (bright warm color)
    raw = light.value
    target = max(0.0, min(1.0, (raw - 1000) / 1000.0))
    # Smooth: very gentle transitions
    if target > light_level:
        light_level = light_level + (target - light_level) * 0.02
    else:
        light_level = light_level + (target - light_level) * 0.015
    # Clamp to prevent drift
    light_level = max(0.0, min(1.0, light_level))
    t = light_level
    new_color = (int(LIGHT_DIM[0] + (LIGHT_BRIGHT[0] - LIGHT_DIM[0]) * t),
                 int(LIGHT_DIM[1] + (LIGHT_BRIGHT[1] - LIGHT_DIM[1]) * t),
                 int(LIGHT_DIM[2] + (LIGHT_BRIGHT[2] - LIGHT_DIM[2]) * t))
    # Only update pixels if the color actually changed
    if new_color != last_light_color:
        last_light_color = new_color
        pixels.fill(new_color)
        pixels.show()

# Sentinel for Light meter mode in animation list
LIGHT_METER = "LIGHT_METER"

# Calibrate: seed the adaptive noise floor
mic.record(samples, len(samples))
input_floor = normalized_rms(samples) + 10
input_ceiling = input_floor + 15.0

# setup bluetooth
ble = BLERadio()
uart_service = UARTService()
advertisement = ProvideServicesAdvertisement(uart_service)

# setup physical buttons
button_a = digitalio.DigitalInOut(board.D4)
button_a.direction = digitalio.Direction.INPUT
button_a.pull = digitalio.Pull.DOWN

button_b = digitalio.DigitalInOut(board.D5)
button_b.direction = digitalio.Direction.INPUT
button_b.pull = digitalio.Pull.DOWN

# Capacitive touch pads for brightness
touch_bright = touchio.TouchIn(board.A1)  # D6 - increase brightness
touch_dim = touchio.TouchIn(board.A2)     # D9 - decrease brightness
prev_touch_bright = False
prev_touch_dim = False

# Setup accelerometer for tap detection
accelo_i2c = busio.I2C(board.ACCELEROMETER_SCL, board.ACCELEROMETER_SDA)
accelo = adafruit_lis3dh.LIS3DH_I2C(accelo_i2c, address=0x19)
accelo.set_tap(1, 100)  # single tap, threshold 100 (medium tap)

# Lists for cycling
COLOR_LIST = [PURPLE, GREEN, RED, BLUE, LIGHT_METER]
PALETTE_LIST = [PALETTE_RAINBOW, VU_METER]
ALL_MODES = [PURPLE, GREEN, RED, BLUE, LIGHT_METER,
             PALETTE_RAINBOW, VU_METER]
color_index = 0
palette_index = 0
all_modes_index = ALL_MODES.index(LIGHT_METER) + 1  # next mode after light meter
BRIGHTNESS_STEP = 0.1
prev_button_a = False
prev_button_b = False

def apply_mode(selection):
    """Apply a mode from any list, clearing all other modes."""
    global active_palette, active_color, active_vu, active_light
    global vu_level, last_vu_input, light_level, last_light_color
    global input_floor, input_ceiling
    active_palette = None
    active_color = None
    active_vu = False
    active_light = False
    if selection == VU_METER:
        vu_level = 0.0
        last_vu_input = 0
        pixels.fill(VU_OFF)
        pixels.show()
        # Brief settle, then seed the adaptive floor
        time.sleep(0.15)
        for _ in range(3):
            mic.record(samples, len(samples))
        mic.record(samples, len(samples))
        input_floor = normalized_rms(samples) + 10
        input_ceiling = input_floor + 15.0
        active_vu = True
    elif selection == LIGHT_METER:
        light_level = 0.0
        last_light_color = (0, 0, 0)
        active_light = True
    elif isinstance(selection, list):
        active_palette = selection
    else:
        active_color = selection

while True:
    # set CPXb up so that it can be discovered by the app
    ble.start_advertising(advertisement)
    # Start with light meter mode
    apply_mode(LIGHT_METER)
    _ = accelo.tapped  # clear any startup tap
    time.sleep(0.5)    # brief delay to ignore boot vibration
    while not ble.connected:
        # Check physical buttons while waiting
        if button_a.value and not prev_button_a:
            apply_mode(COLOR_LIST[color_index])
            color_index = (color_index + 1) % len(COLOR_LIST)
        if button_b.value and not prev_button_b:
            apply_mode(PALETTE_LIST[palette_index])
            palette_index = (palette_index + 1) % len(PALETTE_LIST)
        prev_button_a = button_a.value
        prev_button_b = button_b.value
        # Check capacitive touch for brightness
        if touch_bright.value and not prev_touch_bright:
            pixels.brightness = min(1.0, pixels.brightness + BRIGHTNESS_STEP)
        if touch_dim.value and not prev_touch_dim:
            pixels.brightness = max(0.05, pixels.brightness - BRIGHTNESS_STEP)
        prev_touch_bright = touch_bright.value
        prev_touch_dim = touch_dim.value
        # Check accelerometer tap to cycle modes
        if accelo.tapped:
            apply_mode(ALL_MODES[all_modes_index])
            all_modes_index = (all_modes_index + 1) % len(ALL_MODES)
        update_palette()
        update_breathing()
        update_vu()
        update_light()
        time.sleep(0.02)

    # Now we're connected

    while ble.connected:
        # Check physical buttons
        if button_a.value and not prev_button_a:
            apply_mode(COLOR_LIST[color_index])
            color_index = (color_index + 1) % len(COLOR_LIST)
        if button_b.value and not prev_button_b:
            apply_mode(PALETTE_LIST[palette_index])
            palette_index = (palette_index + 1) % len(PALETTE_LIST)
        prev_button_a = button_a.value
        prev_button_b = button_b.value
        # Check capacitive touch for brightness
        if touch_bright.value and not prev_touch_bright:
            pixels.brightness = min(1.0, pixels.brightness + BRIGHTNESS_STEP)
        if touch_dim.value and not prev_touch_dim:
            pixels.brightness = max(0.05, pixels.brightness - BRIGHTNESS_STEP)
        prev_touch_bright = touch_bright.value
        prev_touch_dim = touch_dim.value
        # Check accelerometer tap to cycle modes
        if accelo.tapped:
            apply_mode(ALL_MODES[all_modes_index])
            all_modes_index = (all_modes_index + 1) % len(ALL_MODES)

        # Keep animating the active mode
        update_palette()
        update_breathing()
        update_vu()
        update_light()

        if uart_service.in_waiting:
            try:
                packet = Packet.from_stream(uart_service)
            except ValueError:
                continue # or pass.

            if isinstance(packet, ColorPacket): # check if a color was sent from color picker
                active_palette = None
                active_color = None
                active_vu = False
                active_light = False
                pixels.fill(packet.color)
            if isinstance(packet, ButtonPacket): # check if a button was pressed from control pad
                if packet.pressed:
                    if packet.button == ButtonPacket.BUTTON_1: # Rainbow palette
                        apply_mode(PALETTE_RAINBOW)
                    if packet.button == ButtonPacket.BUTTON_2: # VU Meter
                        apply_mode(VU_METER)
                    if packet.button == ButtonPacket.BUTTON_3: # Purple
                        apply_mode(PURPLE)
                    if packet.button == ButtonPacket.BUTTON_4: # Light Meter
                        apply_mode(LIGHT_METER)
                    if packet.button == ButtonPacket.UP: # Brighten
                        pixels.brightness = min(1.0, pixels.brightness + BRIGHTNESS_STEP)
                    if packet.button == ButtonPacket.DOWN: # Dim
                        pixels.brightness = max(0.05, pixels.brightness - BRIGHTNESS_STEP)
                    if packet.button == ButtonPacket.LEFT: # Cycle modes backward
                        all_modes_index = (all_modes_index - 1) % len(ALL_MODES)
                        apply_mode(ALL_MODES[all_modes_index])
                    if packet.button == ButtonPacket.RIGHT: # Cycle modes forward
                        apply_mode(ALL_MODES[all_modes_index])
                        all_modes_index = (all_modes_index + 1) % len(ALL_MODES)

        time.sleep(0.02)  # small delay for smooth animation
After downloading the Project Bundle, plug your Circuit Playground Bluefruit into the computer's USB port with a known good USB data+power cable. You should see a new flash drive appear in the computer's File Explorer or Finder (depending on your operating system) called CIRCUITPY. Unzip the folder and copy the following items to the Circuit Playground Bluefruit's CIRCUITPY drive.
lib folder
code.py
Your Circuit Playground Bluefruit CIRCUITPY drive should look like this after copying the lib folder and code.py file:
At the top of the code, the NeoPixels and colors are set up for the Circuit Playground Bluefruit's 10 onboard NeoPixels.
# setup pixels
pixels = neopixel.NeoPixel(board.NEOPIXEL, 10, brightness=1, auto_write=True)

# name colors so you don't need to refer to numbers
RED = (255, 0, 0)
BLACK = (0, 0, 0)
GREEN = (0, 255, 0)
PURPLE = (100, 0, 255)
BLUE = (0, 0, 255)
You can edit the RGB color values to change the breathing color options. Each value ranges from 0 to 255. For example, to add an orange option, you could change RED to (255, 100, 0) or add a new color variable and include it in the COLOR_LIST later in the code.
A six-color rainbow palette is defined using adafruit_fancyled. These colors cycle smoothly across the NeoPixels when rainbow mode is active.
PALETTE_RAINBOW = [fancy.CRGB(1.0, 0.0, 0.0), # Red
           fancy.CRGB(0.5, 0.5, 0.0), # Yellow
           fancy.CRGB(0.0, 1.0, 0.0), # Green
           fancy.CRGB(0.0, 0.5, 0.5), # Cyan
           fancy.CRGB(0.0, 0.0, 1.0), # Blue
           fancy.CRGB(0.5, 0.0, 0.5)] # Magenta
You can edit these CRGB values (which use 0.0 to 1.0 instead of 0 to 255) to change the palette colors or add more entries to create a smoother or wider gradient.
The update_palette() function advances the rainbow animation one frame at a time. The offset variable controls how fast the colors scroll across the LEDs, and the brightness controls the palette intensity.
def update_palette():
    """Advance one frame of the active palette animation."""
    global offset
    if active_palette is None:
        return
    for i in range(NUM_LEDS):
        color = fancy.palette_lookup(active_palette, offset + i / NUM_LEDS)
        color = fancy.gamma_adjust(color, brightness=0.25)
        pixels[i] = color.pack()
    pixels.show()
    offset += 0.05
You can adjust the animation speed and brightness:
offset += 0.05 — Controls how fast the rainbow scrolls. Increase to 0.1 for faster animation, decrease to 0.02 for slower.
brightness=0.25 — Controls the overall brightness of the rainbow palette. Increase up to 1.0 for brighter colors or decrease for dimmer.
When a solid color mode is active (Purple, Green, Red or Blue), the LEDs gently pulse using a sine wave. The update_breathing() function controls this effect.
def update_breathing():
    """Slowly breathe the active solid color between brightness 0.2 and 0.5."""
    if active_color is None:
        return
    # Sine wave oscillates 0-1, scale to 0.2-0.5 range
    brightness = 0.35 + 0.15 * math.sin(time.monotonic() * 1.5)
    r = int(active_color[0] * brightness)
    g = int(active_color[1] * brightness)
    b = int(active_color[2] * brightness)
    pixels.fill((r, g, b))
You can adjust the breathing effect:
time.monotonic() * 1.5 — The 1.5 multiplier controls the breathing speed. Increase to 3.0 for faster pulsing, decrease to 0.5 for very slow breathing.
0.35 — The center brightness of the breathing range. Increase for a brighter baseline.
0.15 — How far above and below the center the brightness oscillates. Increase for more dramatic pulsing, decrease for a subtler effect. The brightness will range from 0.35 - 0.15 (0.2) to 0.35 + 0.15 (0.5).
The VU meter uses the onboard PDM microphone to light up the NeoPixels based on sound level. First, the microphone and audio processing are set up.
mic = audiobusio.PDMIn(
    board.MICROPHONE_CLOCK, board.MICROPHONE_DATA,
    sample_rate=16000, bit_depth=16)
samples = array.array('H', [0] * 320)

CURVE = 2
SCALE_EXPONENT = math.pow(10, CURVE * -0.1)
The CURVE variable controls the logarithmic scaling of the audio input. A higher value makes the meter less sensitive to quiet sounds and more responsive to loud ones. A lower value makes the response more linear.
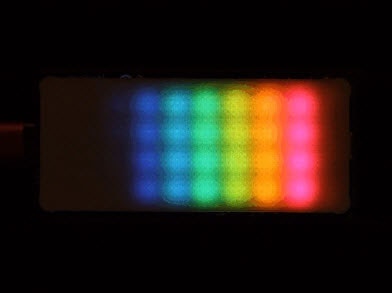
The VU meter colors are mapped to the 10 NeoPixels, with green on the left, yellow in the middle, and red on the right — like a classic audio level meter.
VU_GREEN = (0, 127, 0)
VU_YELLOW = (127, 127, 0)
VU_RED = (127, 0, 0)
VU_OFF = (0, 0, 0)
vu_colors = [VU_GREEN, VU_GREEN, VU_GREEN, VU_GREEN,
             VU_YELLOW, VU_YELLOW, VU_YELLOW,
             VU_RED, VU_RED, VU_RED]
You can edit the RGB values for VU_GREEN, VU_YELLOW, and VU_RED to change the meter colors. You can also rearrange the vu_colors list to change how many LEDs use each color.
The update_vu() function reads the microphone and updates the LEDs. The smoothing values control how quickly the meter rises and falls.
# Smooth: rise slowly, fall even slower
    if target > vu_level:
        vu_level = vu_level + (target - vu_level) * 0.4  # rise speed
    else:
        vu_level = vu_level + (target - vu_level) * 0.15  # fall speed
You can adjust the meter behavior:
0.4 — Rise speed. Increase toward 1.0 for instant response to loud sounds, decrease toward 0.1 for a sluggish rise.
0.15 — Fall speed. Increase for a quicker drop-off when sound stops, decrease for a slow "decay" effect that holds the level longer.
When the code first starts and each time VU meter mode is activated, it calibrates the noise floor to the current ambient sound level. The input_floor is the baseline silence level and input_ceiling sets the top of the dynamic range.
# Calibrate: record initial sample to get ambient noise floor
mic.record(samples, len(samples))
input_floor = normalized_rms(samples) + 2
input_ceiling = input_floor + .5
You can adjust the audio sensitivity:
+ 2 — The margin above the measured ambient noise before any LEDs light up. Increase to 10 or higher to ignore more background noise, decrease if you want the meter to pick up very quiet sounds.
+ .5 — The dynamic range between silence and full-scale (all 10 LEDs lit). This is the most important sensitivity control. Increase to 5.0 or 15.0 to require much louder sounds to fill the meter. Decrease for a more sensitive meter that reacts to quieter sounds.
The light sensor mode uses the onboard light sensor to blend all 10 LEDs between two warm colors based on ambient light.
light = analogio.AnalogIn(board.LIGHT)

# Light meter warm colors
LIGHT_DIM = (52, 5, 1)
LIGHT_BRIGHT = (9, 5, 4)
You can edit the colors:
LIGHT_DIM = (52, 5, 1) — The color shown in a dark room. This is a warm amber glow.
LIGHT_BRIGHT = (9, 5, 4) — The color shown in bright light. This is a soft warm white.
The update_light() function reads the sensor and smoothly transitions between the two colors.
raw = light.value
target = max(0.0, min(1.0, (raw - 1000) / 1000.0))
# Smooth: very gentle transitions
if target > light_level:
	light_level = light_level + (target - light_level) * 0.02
else:
    light_level = light_level + (target - light_level) * 0.015
You can adjust the light meter behavior:
(raw - 1000) / 1000.0 — The first 1000 is the dark threshold (sensor values below this are treated as full dark). The second 1000.0 is the range. Decrease the range to 500.0 for a meter that reaches full brightness in dimmer environments. Increase to 2000.0 to require very bright light.
0.02 — How fast the LEDs brighten when light increases. Increase to 0.1 for quicker response, decrease for slower.
0.015 — How fast the LEDs dim when light decreases. Increase for quicker dimming, decrease for a slower fade.
The onboard LIS3DH accelerometer is configured for single-tap detection, which cycles through all available modes.
accelo_i2c = busio.I2C(board.ACCELEROMETER_SCL, board.ACCELEROMETER_SDA)
accelo = adafruit_lis3dh.LIS3DH_I2C(accelo_i2c, address=0x19)
accelo.set_tap(1, 100)  # single tap, threshold 100 (medium tap)
You can adjust the tap sensitivity:
The first argument 1 sets single-tap detection. Change to 2 for double-tap detection.
The second argument 100 is the tap threshold. Decrease to 60 for more sensitive detection (lighter taps register), increase to 150 for less sensitive detection (requires harder taps).
The mode cycling lists control what each input method cycles through.
COLOR_LIST = [PURPLE, GREEN, RED, BLUE, LIGHT_METER]
PALETTE_LIST = [PALETTE_RAINBOW, VU_METER]
ALL_MODES = [PURPLE, GREEN, RED, BLUE, LIGHT_METER,
             PALETTE_RAINBOW, VU_METER]
COLOR_LIST — Cycled by Button A on the board. Add or remove color entries to customize.
PALETTE_LIST — Cycled by Button B on the board.
ALL_MODES — Cycled by tapping the board and by the Left/Right BLE buttons. This is the master list of every mode.
Touch pads A1 and A2 control brightness, and the step size determines how much each touch changes it.
BRIGHTNESS_STEP = 0.1
You can change 0.1 to a smaller value like 0.05 for finer brightness adjustments, or a larger value like 0.2 for bigger jumps. Brightness is clamped between 0.05 and 1.0.
When connected via the Adafruit Bluefruit app's Control Pad, the numbered buttons and D-pad are mapped to specific modes.
if packet.button == ButtonPacket.BUTTON_1: # Rainbow palette
    apply_mode(PALETTE_RAINBOW)
if packet.button == ButtonPacket.BUTTON_2: # VU Meter
    apply_mode(VU_METER)
if packet.button == ButtonPacket.BUTTON_3: # Light Meter
    apply_mode(LIGHT_METER)
if packet.button == ButtonPacket.BUTTON_4: # Light Meter
    apply_mode(LIGHT_METER)
if packet.button == ButtonPacket.UP: # Brighten
    pixels.brightness = min(1.0, pixels.brightness + BRIGHTNESS_STEP)
if packet.button == ButtonPacket.DOWN: # Dim
    pixels.brightness = max(0.05, pixels.brightness - BRIGHTNESS_STEP)
if packet.button == ButtonPacket.LEFT: # Cycle modes backward
    all_modes_index = (all_modes_index - 1) % len(ALL_MODES)
    apply_mode(ALL_MODES[all_modes_index])
if packet.button == ButtonPacket.RIGHT: # Cycle modes forward
    apply_mode(ALL_MODES[all_modes_index])
    all_modes_index = (all_modes_index + 1) % len(ALL_MODES)
You can remap any button to any mode by changing the apply_mode() call. For example, to make Button 3 activate Purple instead of Light Meter, change apply_mode(LIGHT_METER) to apply_mode(PURPLE). The color picker in the Bluefruit app can also be used to send any custom color directly to the LEDs.
Lay the diffuser with the channels facing up.
Align the corner of each panel to the corner of the channel.
Insert each panel at a 15 degree angle to press fit each panel into the diffuser.
Place M3 nuts into the "cable-tube" part.
Align the screws holes to the three matching screws mounts on the "case-btm" part.
Use M3x6mm screws to combine the parts.
Place the Circuit Playground with the USB port aligned to the cutout on the "case-btm" part.
Align the "Case-top" part to the microphone and light meter cutouts.
The board is mounted to the "case-btm" part with M3x6mm screws.
Pre-fasten M2x6mm screws to the panels.
Align each screw to the screw mounts on the sides of the "case-btm" part.
Plug the USB cable into the port.
Route the cable into the cutout on the "cable-tube" part.
Pass the USB cable through cutout on the "tube-coupler".
Align the screw holes on both parts and use an M3x5mm screw to join the coupler to the "cable-tube" part.
Twist the threads on the pipes and base together until the channels all align.
Combine the chain links by passing them through the center cuts.
Press fit the USB cable into the pipe channel down to the base.
The Bluefruit LE Connect app provides iOS devices with a variety of tools to communicate with Bluefruit LE devices, such as the Circuit Playground Bluefruit! These tools cover basic communication and info reporting as well as more project specific uses such as remote button control and a NeoPixel color picker.
The iOS app is a free download from Apple's App Store.
Find the Circuit Playground Bluefruit to connect.
The name should start with CIRCUITPYXXX
Tap on the controller option and then either the color picker or control pad module.
In the controller module:
The UP arrow increases the brightness of the LEDs.
The DOWN arrow decreases the brightness of the LEDs.
Buttons 1 is the Rainbow Animation.
Button 2 is the Audio Reaction mode.
Button 3 is a Purple Color.
Button 4 is the Light Meter mode.
Select a color and tap on send to set the lamp color.
The IOS version also includes a companion watch app.
Once connected a Circuit Playground Bluefruit device using a iPhone or iPad, launch the watch Bluefruit app.
Select the controller option on the iPhone or iPad and then the watch will show the color picker and control pad modules.
In the control pad module, swipe left or right to access the arrows or the 1-4 buttons.
The color picker has a nice palette of colors to select from or use the RGB method to really dial in a color!