Mfr Part # 4333
CIRCUIT PLAYGROUND BLUEFRUIT BLE
Adafruit Industries LLC
License: See Original Project Addressable LEDs WS2812/SK6812 (NeoPixel) Circuit Playground
Guide by John Park
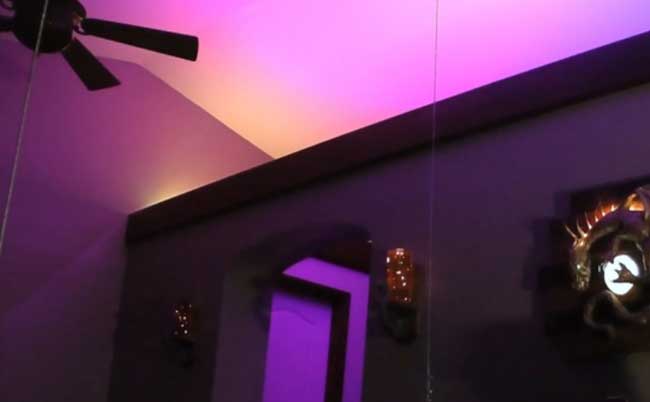
RGB Bluetooth LE light bulbs (a.k.a. "smart bulbs") for household light sockets are really neat-o, allowing you to create custom lighting effects for your room. Typically, these are controlled with a mobile device app, but we think it's much more fun to build our own custom remote and use physical sliders to mix colors!
Using CircuitPython, running on the nRF52840-based Circuit Playground Bluefruit (CPB), makes it all possible. We can send the same commands over Bluetooth LE (BLE) from the CPB as you would normally from your mobile device, the proprietary MagicLight app, and a whole lot more!
We'll harness the Circuit Playground Bluefruit board's buttons, slide switch, on-board NeoPixels, and speaker to act as RGB color value indicators, connection state UI, two-position dimmer switch, and momentary light blinkers!
Let's get on with the magic!
To understand how we communicate between the MagicLight Bulb and the Circuit Playground Bluefruit (CPB), it's first important to get an overview of how Bluetooth Low Energy (BLE) works in general.
The nRF52840 chip on the CPB uses Bluetooth Low Energy, or BLE. BLE is a wireless communication protocol used by many devices, including mobile devices. You can communicate between your CPB and peripherals such as the Magic Light, mobile devices, and even other CPB boards!
There are a few terms and concepts commonly used in BLE with which you may want to familiarize yourself. This will help you understand what your code is doing when you're using CircuitPython and BLE.
Two major concepts to know about are the two modes of BLE devices:
Broadcasting mode (also called GAP for Generic Access Profile).
Connected device mode (also called GATT for Generic ATTribute Profile).
GAP mode deals with broadcasting peripheral advertisements, such as "I'm a device named LEDBlue-19592CBC", as well as advertising information necessary to establish a dedicated device connection if desired. The peripheral may also be advertising available services.
GATT mode deals with communications and attribute transfer between two devices once they are connected, such as between a heart monitor and a phone, or between your CPB and the Magic Light.
Device Roles:
Peripheral - The low-power device that broadcasts advertisements. Examples of peripherals include heart rate monitor, smart watch, fitness tracker, iBeacon, and the Magic Light. The CPB can also work as a peripheral.
Central - The host "computer" that observes advertisements being broadcast by the Peripherals. This is often a mobile device such as a phone, tablet, desktop or laptop, but the CPB can also act as a central (which it will in this project).
Terms:
Advertising - Information sent by the peripheral before a dedicated connection has been established. All nearby Centrals can observe these advertisements. When a peripheral device advertises, it may be transmitting the name of the device, describing its capabilities, and/or some other piece of data. Central can look for advertising peripherals to connect to and use that information to determine each peripheral's capabilities (or Services offered, more on that below).
Device Roles:
Server - In connected mode, a device may take on a new role as a Server, providing a Service available to clients. It can now send and receive data packets as requested by the Client device to which it now has a connection.
Client - In connected mode, a device may also take on a new role as Client that can send requests to one or more of a Server's available Services to send and receive data packets.
NOTE: A device in GATT mode can take on the role of both Server and Client while connected to another device.
Terms:
Profile - A pre-defined collection of Services that a BLE device can provide. For example, the Heart Rate Profile, or the Cycling Sensor (bike computer) Profile. These Profiles are defined by the Bluetooth Special Interest Group (SIG). For devices that don't fit into one of the pre-defined Profiles, the manufacturer creates their own Profile. For example, there is not a "Smart Bulb" profile, so the Magic Light manufacturer has created their own unique one.
Service - A function the Server provides. For example, a heart rate monitor armband may have separate Services for Device Information, Battery Service, and Heart Rate itself. Each Service is comprised of collections of information called Characteristics. In the case of the Heart Rate Service, the two Characteristics are Heart Rate Measurement and Body Sensor Location. The peripheral advertises its services.
Characteristic - A Characteristic is a container for the value, or attribute, of a piece of data along with any associated metadata, such as a human-readable name. A characteristic may be readable, writable, or both. For example, the Heart Rate Measurement Characteristic can be served up to the Client device and will report the heart rate measurement as a number, as well as the unit string "bpm" for beats-per-minute. The Magic Light Server has a Characteristic for the RGB value of the bulb which can be written to by the Central to change the color. Characteristics each have a Universal Unique Identifier (UUID) which is a 16-bit or 128-bit ID.
Packet - Data transmitted by a device. BLE devices and host computers transmit and receive data in small bursts called packets.
This guide is another good introduction to the concepts of BLE, including GAP, GATT, Profiles, Services, and Characteristics.
A good way to get familiar with BLE is to read and write to individual Characteristics using the Nordic nRF Connect app for Android and iOS.
NOTE: the Android version is much more feature rich than the iOS version, but you can use either for these examples.
First, download and install nRF Connect on your mobile device (you cannot use the PC/Mac app without a special Nordic dongle).
Launch the app and you'll see a list of BLE peripheral devices that are broadcasting their advertisements.
Screw the bulb into a standard lamp socket and turn it on.
Find the LEDBlue device and click on the Connect button. (In case it doesn't show up at first, press the Scan button to refresh the list.)
The app will first show the Advertisement Data screen, indicating signal strength of the Magic Light. Swipe left to go to the Services page.
Unfortunately, there isn't much helpful info here about what these three Services are, so we'll need to dig deeper into the Characteristics to fine what we need.
Through some poking around in the Android version of the app we discovered that the Service with UUID of FFE5 is the one that contains the Characteristics for RGB color we want.
By pressing the down arrow Read icons for each Characteristic we can request Attributes from the Magic Bulb. Now we see that the Characteristic with UUID FFE6 has an associated User Description Characteristic with the Attribute of "Red"!
By pressing the up arrow "Write" icon next to the FFE6 Characteristic we can open the Write Value dialog box to send an attribute value byte array. In this case we can send anything from 00 to FF in hex (this is 0-255 levels). Type in FF for full blast red, then press the WRITE button (on Android it is labeled SEND).
The MagicLight Service has a characteristic each for Red, Green, Blue, and White, which we explored above, as well as a combined characteristic for RGBW (although the White element does not seem to be enabled in this characteristic for some reason).
In order to write to the RGB combined attribute, use the UUID FFE9. The byte array looks like this:
56 FF FF FF 00 F0 AA
The critical components here are the second, third, and fourth bytes, which are red, green, and blue. The range is 00-FF (or 0-255 in decimal) so that byte array command would tell the bulb to go full blast red, green, and blue.
Next, we'll set up the Circuit Playground Bluefruit with CircuitPython, libraries, and code so we can use it as a Central and a Client to work with the Magic Light bulb.
Follow this quick step-by-step to install or update CircuitPython on your Circuit Playground Bluefruit.
Download the latest version of CircuitPython for this board via circuitpython.org
Click the link above and download the latest UF2 file
Download and save it to your Desktop (or wherever is handy).
Plug your Circuit Playground Bluefruit into your computer using a known-good data-capable USB cable.
A lot of people end up using charge-only USB cables and it is very frustrating! So make sure you have a USB cable you know is good for data sync.
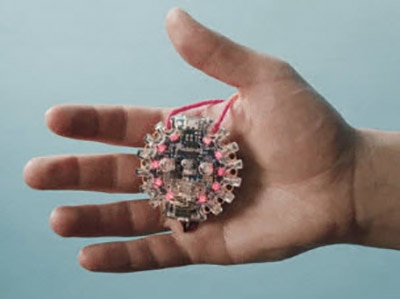
Double-click the small Reset button in the middle of the CPB (indicated by the red arrow in the image). The ten NeoPixel LEDs will all turn red, and then will all turn green. If they turn all red and stay red, check the USB cable, try another USB port, etc. The little red LED next to the USB connector will pulse red - this is ok!
If double-clicking doesn't work the first time, try again. Sometimes it can take a few tries to get the rhythm right!
(If double-clicking doesn't do it, try a single-click!)
You will see a new disk drive appear called CPLAYBTBOOT.
Drag the adafruit_circuitpython_etc.uf2 file to CPLAYBTBOOT.
The LEDs will turn red. Then, the CPLAYBTBOOT drive will disappear, and a new disk drive called CIRCUITPY will appear.
That's it, you're done! :)
To use with CircuitPython, you need to first install a few libraries, into the lib folder on your CIRCUITPY drive. Then you need to update code.py with the example script.
Thankfully, we can do this in one go. In the example below, click the Download Project Bundle button below to download the necessary libraries and the code.py file in a zip file. Extract the contents of the zip file, open the directory CPB_Magic_Light_Mixer/ and then click on the directory that matches the version of CircuitPython you're using and copy the contents of that directory to your CIRCUITPY drive.
Your CIRCUITPY drive should now look similar to the following image:
# SPDX-FileCopyrightText: 2020 John Edgar Park for Adafruit Industries
#
# SPDX-License-Identifier: MIT

# Magic Light Bulb remote color mixer
# Sends RGB color values, read from three faders on CPB to the bulb
# https://www.magiclightbulbs.com/collections/bluetooth-bulbs

import adafruit_ble
from adafruit_ble.advertising.standard import ProvideServicesAdvertisement
from adafruit_ble_magic_light import MagicLightService
import _bleio
import board
from analogio import AnalogIn
from adafruit_circuitplayground import cp


def find_connection():
    for connection in radio.connections:
        if MagicLightService not in connection:  # Filter services
            continue
        return connection, connection[MagicLightService]
    return None, None

radio = adafruit_ble.BLERadio()


def scale(value):
    # Scale a value from 0-65535 (AnalogIn range) to 0-255 (RGB range)
    return int(value / 65535 * 255)
a4 = AnalogIn(board.A4)  # red slider
a5 = AnalogIn(board.A5)  # green slider
a6 = AnalogIn(board.A6)  # blue slider

cp.pixels.brightness = 0.1
dimmer = 1.0

active_connection, bulb = find_connection()  # In case already connected

while True:
    if not active_connection:  # There's no connection, so let's scan for one
        cp.pixels[0] = (60, 40, 0)  # set CPB NeoPixel 0 to yellow while searching
        print("Scanning for Magic Light...")
        # Scan and filter for advertisements with ProvideServicesAdvertiesment type
        for advertisement in radio.start_scan(ProvideServicesAdvertisement):
            # Filter further for advertisements with MagicLightService
            if MagicLightService in advertisement.services:
                active_connection = radio.connect(advertisement)
                print("Connected to Magic Light")
                cp.pixels[0] = (0, 0, 255)  # Set NeoPixel 0 to blue when connected
                # Play a happy tone
                cp.play_tone(440, 0.1)
                cp.play_tone(880, 0.1)
                print("Adjust slide potentiometers to mix RGB colors")
                try:
                    bulb = active_connection[MagicLightService]
                except _bleio.ConnectionError:
                    print("disconnected")
                    continue
                break
        radio.stop_scan()  # Now that we're connected, stop scanning

    while active_connection.connected:  # Connected, now we can set attrs to change colors
        # Toggle slide switch to go to half or full brightness
        if cp.switch:
            cp.red_led = True
            dimmer = 0.5
        else:
            cp.red_led = False
            dimmer = 1.0

        # Press the 'A' button to momentarily black the bulb
        if cp.button_a:
            dimmer = 0.0

        r = scale(a4.value * dimmer)
        g = scale(a5.value * dimmer)
        b = scale(a6.value * dimmer)

        # Press the 'B' button to momentarily white the bulb
        if cp.button_b:
            r, g, b = (255, 255, 255)

        color = (r, g, b)

        try:
            bulb[0] = color  # Send color to bulb's color characteristic
        except _bleio.ConnectionError:
            print("disconnected")
            continue
        cp.pixels[2] = (r, 0, 0)
        cp.pixels[3] = (0, g, 0)
        cp.pixels[4] = (0, 0, b)
        cp.pixels[7] = (color)

    active_connection = None  # Not connected, start scanning again
    cp.pixels[0] = (60, 40, 0)
First, the code imports the libraries necessary for using Bluetooth LE (adafruit_ble, _bleio) and the more specialized adafruitble_magic_light library to deal with the specifics of this profile.
We also import adafruit_ble.advertising.standard ProvideServicesAdvertisement so we can do some filtering of the Peripheral advertisements being broadcast by myriad devices and hone in on the ones we want.
Additionally, we import board, analogio AnalogIn, and adafruit_circuitplayground so we can use the sliders, buttons, slide switch, on-board NeoPixels, and speaker on the CPB with simple, high-level commands.
import adafruit_ble
from adafruit_ble.advertising.standard import ProvideServicesAdvertisement
from adafruit_ble_magic_light import MagicLightService
import _bleio
import board
from analogio import AnalogIn
from adafruit_circuitplayground import cp
Next, we'll define a function called find_connection() that we'll use later to search through available Peripheral connections for only the one that offers the MagicLightService.
def find_connection():
    for connection in radio.connections:
        if MagicLightService not in connection:  # Filter services
            continue
        return connection, connection[MagicLightService]
return None, NoneWe instantiate the Bluefruit LE radio with this command:
radio = adafruit_ble.BLERadio()
To use the slide potentiometers, we'll need to define a function called scale(value) that can convert the raw analog voltage readings to a 0-255 range that's used per RGB color value.
We'll also define the analog pin read variables for the CPB's A4, A5, and A6 pads.
def scale(value):
    # Scale a value from 0-65535 (AnalogIn range) to 0-255 (RGB range)
    return int(value / 65535 * 255)
a4 = AnalogIn(board.A4)  # red slider
a5 = AnalogIn(board.A5)  # green slider
a6 = AnalogIn(board.A6)  # blue slider
Next, we'll set the on-board NeoPixel brightness using the cp.pixels.brightness = 0.1 command.
We'll also create a variable called dimmer and set it to a value of 1.0 -- this will be used as a multiplier for the color values and will be changed to 0.5 when the slide switch is engaged.
During the main loop of the program, we check to see if there's an active connection, and if not, we set the first CPB NeoPixel to yellow.
We then begin scanning through the filtered advertisements for the MagicLightService that's being broadcast by the bulb.
If the bulb is found, a connection is made and the CPB's first pixel is set to blue, and a happy tone is played, and the radio stops scanning for connections.
while True:
    if not active_connection:  # There's no connection, so let's scan for one
        cp.pixels[0] = (60, 40, 0)  # set CPB NeoPixel 0 to yellow while searching
        print("Scanning for Magic Light...")
        # Scan and filter for advertisements with ProvideServicesAdvertiesment type
        for advertisement in radio.start_scan(ProvideServicesAdvertisement):
            # Filter further for advertisements with MagicLightService
            if MagicLightService in advertisement.services:
                active_connection = radio.connect(advertisement)
                print("Connected to Magic Light")
                cp.pixels[0] = (0, 0, 255)  # Set NeoPixel 0 to blue when connected
                # Play a happy tone
                cp.play_tone(440, 0.1)
                cp.play_tone(880, 0.1)
                print("Adjust slide potentiometers to mix RGB colors")
                try:
                    bulb = active_connection[MagicLightService]
                except _bleio.ConnectionError:
                    print("disconnected")
                    continue
                break
radio.stop_scan() # Now that we're connected, stop scanningOnce the connection has been made, we check the CPB slide switch to set half or full brightness and also flip the on board red_led on or off respectively to indicate dim/full mode.
We check for the CPB A button press and set the dimmer value to 0.0 if pressed.
The r, g, b variables are adjusted according to the scaled analog readings of the slide potentiometers and multiplied by the dimmer variable value.
We check for the CPB B button press and set the r, g, b values to 255, 255, 255 if pressed.
Now, we create a color variable and cast the current r, g, b values to it, so we can send these values to the bulb.
while active_connection.connected:  # Connected, now we can set attrs to change colors
        # Toggle slide switch to go to half or full brightness
        if cp.switch:
            cp.red_led = True
            dimmer = 0.5
        else:
            cp.red_led = False
            dimmer = 1.0

        # Press the 'A' button to momentarily black the bulb
        if cp.button_a:
            dimmer = 0.0

        r = scale(a4.value * dimmer)
        g = scale(a5.value * dimmer)
        b = scale(a6.value * dimmer)

        # Press the 'B' button to momentarily white the bulb
        if cp.button_b:
            r, g, b = (255, 255, 255)

        color = (r, g, b)

        try:
            bulb[0] = color  # Send color to bulb's color characteristic
        except _bleio.ConnectionError:
            print("disconnected")
continueSince we've got spare pixels on the CPB, why not use them for some user feedback?! We'll set pixels 2, 3, and 4 to the pure red, green, and blue levels and then set pixel 7 to the combined color value, the same as the bulb.
cp.pixels[2] = (r, 0, 0)
cp.pixels[3] = (0, g, 0)
cp.pixels[4] = (0, 0, b)
cp.pixels[7] = (color)
Next, we'll assemble the parts to use our color mixer!
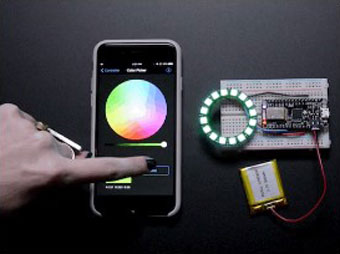
I love using slide potentiometers (a.k.a. faders) for this type of project, because at a glance you can tell how much of each color is selected. One problem that can arise, however, when using slide pots, is that they don't usually fit easily on a breadboard or Perma proto board. These adorable little 35mm faders solve this problem! Since the bottom pin that is labeled "3" is the ground pin, all of the faders can share the common ground rail on the breadboard!
Each slide potentiometer will act as a voltage divider, with the Circuit Playground Bluefruit analog pins reading the wiper's varying output.
The pin assignments are as follows:
Pin 1 = 3.3VDC
Pin 2 = wiper (to analog input)
Pin 3 = ground
Insert the three slide potentiometers into the breadboard as shown. You want the pin 3 legs of all three pots to be placed into the ground rail (next to the blue line).
Insert pins 1 and 2 so there is a free row of breadboard pins above them, this is where you'll make the wired connections to the CPB.
Use three small jumper wires (sometimes called "staples") to connect the pin 1 of each slide pot to the red +V rail of the breadboard as shown here. Looking from the top down, pin 1 is the pin on the left at the top of each slide pot.
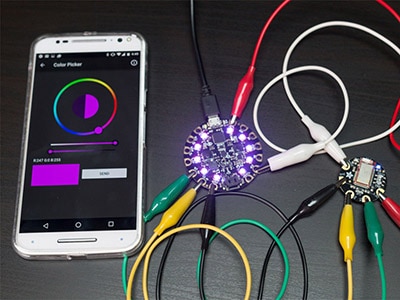
Now we can use alligator clip leads with male header pins to connect the sliders to the CPB.
Insert the red lead into the breadboard's top red +V rail.
Insert the black lead into the breadboard's bottom black ground rail.
Insert the yellow lead into the left slider's pin 2 column on the breadboard.
Insert the green lead into the middle slider's pin 2 column on the breadboard.
Insert the blue lead into the right slider's pin 2 column on the breadboard.
Now, you can connect the alligator clips to the associated pads on the Circuit Playground Bluefruit:
red to 3.3V
black to GND
yellow to A4
green to A5
blue to A6
You can now power up the Circuit Playground Bluefruit board -- here I've used a 3.7VDC Li-Poly battery plugged into the battery JST-SH port. You can also use an AA or AAA battery pack, or power over the USB port.
Turn off the socket the MagicBulb is plugged into, then turn it back on. This is so that we drop any previous connect between the bulb and your mobile device, since the bulb cannot be connected to more than one Client device at a time.
The CPB's first NeoPixel will be lit yellow while it waits to find the bulb, then switch to blue when the connection is made. You'll also get a happy little beep-BEEP!
You can immediately begin mixing the bulb's colors using the faders for red, green, and blue.
Try flipping the CPB's slide switch left for half-brightness mode, or right for full brightness.
The A button will "mute" or "black" the bulb out, and the B button will set the bulb at full brightness while held.
Now you can have fun mixing your colors remotely!