Mfr Part # 4500
CLUE NRF52840 EXPRESS
Adafruit Industries LLC
License: See Original Project Qwiic STEMMA
Courtesy of Adafruit
Guide by Carter Nelson
Overview
The classic method for testing for milk freshness is to give it a quick sniff check. If it smells "bad", then it probably is. This is great, as long as your sense of smell is working. But maybe covid, congenital anosmia, a stuffy cold, or something else has reduced your sense of smell. What then?
In this guide we investigate the potential for using a gas sensor as a way to test for milk freshness. An SGP30 and a CLUE are used to make a little "freshness checker" device. We then use this in a simple experiment to see if it can detect spoiled milk.
This project does NOT require any soldering and is a great little science experiment.
Hardware
Here is a summary of the hardware needed for this project.
This is the battery shown in the guide:
but you can use any other similar lithium-ion battery option:
Lithium-Ion Batteries
Background Information
In this guide we use the phrase "covid" and/or "coronavirus" to refer to the Coronavirus disease 2019 (COVID-19) as caused by the severe acute respiratory syndrome coronavirus 2 (SARS-CoV-2).
Covid Related Loss of Smell
The CDC list "New loss of taste or smell" as one the main symptoms of covid. Sickness related loss of smell is nothing new, even the common cold can cause it to happen. However, due to the global pandemic scope of covid, this issue has received renewed and increased significance. There have been various news stories covering this issue and how it has impacted people's ability to "sniff" for dirty laundry, rotten food, etc.
We thought this issue would make for some great science and wanted to see if electrical sensors could be used. Here we share our results on making a milk freshness tester.
How Milk Spoils
We use the term "bad" to describe "spoiled" milk, but really, it's just nature doing its thing. There are numerous bacteria that love milk. Unfortunately for us, their consumption of milk produces byproducts that we find distasteful and can even be harmful.
Spoilage is also a vague term. As this paper (PDF) puts it:
Milk spoilage is an indefinite term and difficult to measure with accuracy.
This paper summarizes various techniques that have been investigated as a way to detect spoilage, including:
pH
electrical methods
magnetoelastic sensors
gas sensor arrays
infrared spectroscopy
protein count
It is the gas sensor based approach we are interested in here. This is analogous to what we do when we sniff milk to check freshness. Our noses are essentially gas sensors. But if covid (or something else) has knocked out your sense of smell, then your gas sensor is broken. Can we use an electrical gas sensor instead?
Electrical Nose
The general of idea of gas sensor-based milk spoilage detection has been investigated by others.
Evaluation based on change over time
Milk-sense: a volatile sensing system recognises spoilage bacteria and yeasts in milk
Conducting polymer detector for microbial volatiles
There are various gases that are discussed amongst these papers, but a common approach is to use microbial produced volatile organic compounds (VOCs) and carbon dioxide (CO2). Well, the SGP30 from Sensirion , as used on the Adafruit SGP30 STEMMA QT breakout, can detect both of these.
So, can the SPG30 be used to create an "electric nose"? Well, let's science this and find out.
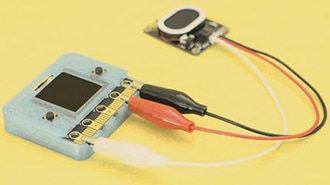
Build the Checker
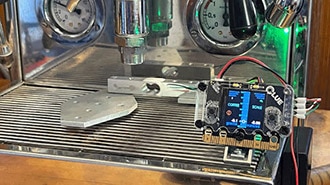
Let's start by putting together our CLUE Milk Freshness Checker. The CLUE and SGP-30 are the key parts. For the other items, we used some things that can hopefully be found lying around the house. If not, feel free to substitute for whatever is available to achieve the same general arrangement.
CLUE board
SGP-30 sensor
Battery
Stemma QT cable
Popsicle stick
Double sided tape
Rubber band
Put a piece of double-sided tape about the same size as the SGP-30 at one end of the popsicle stick.
Place the SGP-30 firmly onto the double-sided tape and attach the Stemma QT cable.
Use the rubber band to secure the CLUE and battery to the other end of the popsicle stick.
Plug in the Stemma QT cable and battery.
Do NOT let the SGP-30 touch the milk. It is not a moisture proof sensor.
Now move on to setting up the CLUE for CircuitPython usage and loading the code. It comes with some preset values we determined in our testing. We'll cover how you can alter these later.
CircuitPython on CLUE
CircuitPython is a derivative of MicroPython designed to simplify experimentation and education on low-cost microcontrollers. It makes it easier than ever to get prototyping by requiring no upfront desktop software downloads. Simply copy and edit files on the CIRCUITPY flash drive to iterate.
The following instructions will show you how to install CircuitPython. If you've already installed CircuitPython but are looking to update it or reinstall it, the same steps work for that as well!
Set up CircuitPython Quick Start!
Follow this quick step-by-step for super-fast Python power :)
Download the latest version of CircuitPython for CLUE from circuitpython.org
Click the link above to download the latest version of CircuitPython for the CLUE.
Download and save it to your desktop (or wherever is handy).
Plug your CLUE into your computer using a known-good USB cable.
A lot of people end up using charge-only USB cables and it is very frustrating! So make sure you have a USB cable you know is good for data sync.
Double-click the Reset button on the top (magenta arrow) on your board, and you will see the NeoPixel RGB LED (green arrow) turn green. If it turns red, check the USB cable, try another USB port, etc. Note: The little red LED next to the USB connector will pulse red. That's ok!
If double-clicking doesn't work the first time, try again. Sometimes it can take a few tries to get the rhythm right!
You will see a new disk drive appear called CLUEBOOT.
Drag the adafruit-circuitpython-clue-etc.uf2 file to CLUEBOOT.
The LED will flash. Then, the CLUEBOOT drive will disappear, and a new disk drive called CIRCUITPY will appear.
If this is the first time, you're installing CircuitPython or you're doing a completely fresh install after erasing the filesystem, you will have two files - boot_out.txt, and code.py, and one folder - lib on your CIRCUITPY drive.
If CircuitPython was already installed, the files present before reloading CircuitPython should still be present on your CIRCUITPY drive. Loading CircuitPython will not create new files if there was already a CircuitPython filesystem present.
That's it, you're done! :)
CLUE CircuitPython Libraries
The CLUE is packed full of features like a display and a ton of sensors. Now that you have CircuitPython installed on your CLUE, you'll need to install a base set of CircuitPython libraries to use the features of the board with CircuitPython.
Follow these steps to get the necessary libraries installed.
Installing CircuitPython Libraries on your CLUE
If you do not already have a lib folder on your CIRCUITPY drive, create one now.
Then, download the CircuitPython library bundle that matches your version of CircuitPython from CircuitPython.org.
Download the latest library bundle from circuitpython.org
The bundle downloads as a .zip file. Extract the file. Open the resulting folder.
Open the lib folder found within.
Once inside, you'll find a lengthy list of folders and .mpy files. To install a CircuitPython library, you drag the file or folder from the bundle lib folder to the lib folder on your CIRCUITPY drive.
Copy the following folders and files from the bundle lib folder to the lib folder on your CIRCUITPY drive:
adafruit_apds9960
adafruit_bmp280.mpy
adafruit_bus_device
adafruit_clue.mpy
adafruit_display_shapes
adafruit_display_text
adafruit_lis3mdl.mpy
adafruit_lsm6ds
adafruit_register
adafruit_sht31d.mpy
adafruit_slideshow.mpy
neopixel.mpy
Your lib folder should look like the image on the left. These libraries will let you run the demos in the CLUE guide.
Code
Here's how to load the code and assets as well as some additional libraries you'll need.
Additional Libraries
In addition to the main libraries needed for CLUE support covered in the previous section, you'll also need to install the libraries listed here.
You can download the latest library bundle from the CircuitPython webpage.
Make sure you have a copy of these in your CIRCUITPY/lib folder.
adafruit_bitmap_font
adafruit_imageload
adafruit_sgp30.py
Here's a summary:
Freshness Indication
The code below comes with preset values for TVOC_LEVELS used to determine milk freshness. In the next section we discuss the experiment we ran to determine these values as well as how you can alter them. Once set, the CLUE display will indicate milk "freshness" as follows:
GOOD + smiling cow = the TVOC levels are very low, so milk should be good.
SUS? + confused cow = the TVOC levels are high enough that the milk may be starting to turn.
BAD! + frowning cow = the TVOC level are high enough the milk should be considered bad.
Code
Use the Project ZIP link below to download the code as well as the bitmaps and font files used in a single zip file.
Drag the entire bmps and fonts folders to your CIRCUITPY folder. These assets will live in those subfolders.
Save the code listing as code.py into your CIRCUITPY folder so it will run automatically when powered up.
# SPDX-FileCopyrightText: 2021 Carter Nelson for Adafruit Industries
#
# SPDX-License-Identifier: MIT

import time
import board
import displayio
import adafruit_sgp30
from adafruit_bitmap_font import bitmap_font
from adafruit_display_text import label
import adafruit_imageload
from adafruit_clue import clue

# --| User Config |-------------------------
TVOC_LEVELS = (80, 120)  # set two TVOC levels
MESSAGES = ("GOOD", "SUS?", "BAD!")  # set three messages (4 char max)
# ------------------------------------------

# setup UI
cow_bmp, cow_pal = adafruit_imageload.load("bmps/milk_bg.bmp")
background = displayio.TileGrid(cow_bmp, pixel_shader=cow_pal)

mouth_bmp, mouth_pal = adafruit_imageload.load("bmps/mouth_sheet.bmp")
mouth = displayio.TileGrid(
    mouth_bmp,
    pixel_shader=mouth_pal,
    tile_width=40,
    tile_height=20,
    width=1,
    height=1,
    x=35,
    y=110,
)

msg_font = bitmap_font.load_font("fonts/Alphakind_28.bdf")
msg_font.load_glyphs("".join(MESSAGES))
message = label.Label(msg_font, text="WAIT", color=0x000000)
message.anchor_point = (0.5, 0.5)
message.anchored_position = (172, 38)

data_font = bitmap_font.load_font("fonts/F25_Bank_Printer_Bold_12.bdf")
data_font.load_glyphs("eTVOC=12345?")
tvoc = label.Label(data_font, text="TVOC=?????", color=0x000000)
tvoc.anchor_point = (0, 1)
tvoc.anchored_position = (5, 235)

eco2 = label.Label(data_font, text="eCO2=?????", color=0x000000)
eco2.anchor_point = (0, 1)
eco2.anchored_position = (130, 235)

splash = displayio.Group()
splash.append(background)
splash.append(mouth)
splash.append(message)
splash.append(tvoc)
splash.append(eco2)
clue.display.root_group = splash

# setup SGP30 and wait for initial warm up
i2c = board.I2C()  # uses board.SCL and board.SDA
# i2c = board.STEMMA_I2C()  # For using the built-in STEMMA QT connector on a microcontroller
sgp30 = adafruit_sgp30.Adafruit_SGP30(i2c)
time.sleep(15)

# loop forever
while True:
    eCO2, TVOC = sgp30.iaq_measure()

    tvoc.text = "TVOC={:5d}".format(TVOC)
    eco2.text = "eCO2={:5d}".format(eCO2)

    level = 0
    for thresh in TVOC_LEVELS:
        if TVOC <= thresh:
            break
        level += 1

    if level <= len(TVOC_LEVELS):
        message.text = MESSAGES[level]
        mouth[0] = level
    else:
        message.text = "????"

    time.sleep(1)
Experiment
Here is the simple experiment we ran to determine the specific SPG-30 sensor values used in the code.
The experiment was carried out during February 2021 with the milk shown.
Data was collected February 28, 2021.
Each day, a small amount of milk was poured into a glass and labeled with the current date. This was done for 5 days to produce a series of milk of differing ages.
We used the code to provide a readout of the SGP-30's TVOC and eCO2 - the values shown in the grass at the bottom of the display.
At this point, don't worry about what the cow says.
Do NOT let the SGP-30 touch the milk. It is not a moisture proof sensor.
For each sample, we lowered the sensor into the glass without touching the milk, slowly moved it around, and watched the readings for about 1 minute.
We then wrote down the observed range for each gas reading.
Here is a summary of the readings we obtained:
Now we have values we can use in our code to determine milk freshness. We considered there to be three levels:
GOOD - low readings very close to fresh milk
SUS? - the readings are slightly elevated, milk is sus
BAD! - milk that has obviously gone bad
Based on the values we observed, we decided on TVOC <= 80 as the cutoff for GOOD, TVOC <= 120 as the cutoff for SUS, and anything above that as BAD!
However, different milk may age in different ways. Different environmental conditions, like temperature and humidity, may also affect the readings. Further, your personal level of comfort on what constitutes "bad" milk, may be different than others. Therefore, we suggest you repeat the above experiment.
We suggest you repeat this experiment!
Adjusting the Code
You can easily adjust the code to change the cutoff TVOC levels used for freshness detection. You can even customize what the cow says. Just look for these lines at the top of the code:
# --| User Config |-------------------------
TVOC_LEVELS = (80, 120)  # set two TVOC levels
MESSAGES = ("GOOD", "SUS?", "BAD!")  # set three messages (4 char max)
# ------------------------------------------
and change as needed. Note there are only two TVOC levels to specify for a total of three freshness levels.
Other Sensor Values
We decided to keep things simple and just use the SGP-30's TVOC reading. But note in the data above that eCO2 also increased with milk age. This production of CO2 is mentioned in the research papers previously cited. Perhaps a more sophisticated approach could be used that take both readings into account? We leave that up to any intrepid scientist out there that wishes to investigate further.
Other Sensors
We tried a few other sensors as well, but they did not seem to have any useful "milk freshness" related signal. At least nothing with as 000good a signal-to-noise ratio as the SGP-30.
Other Uses
We also thought this idea could be used for detecting dirty laundry. However, that did not seem to work - at least not as easy as the approach above for milk. This may be due to the various dyes used to color clothing producing VOCs that mask any similar signal from "dirty" smells.